

5 Tips for Getting Stunning Photos of your Kids

As a photographer, I’m fully aware of the need, and desire to capture great images of your children during their youth. As a mother of five, I am also aware that, short of hiring Annie Lebowitz to follow you around, consistently capturing magazine worthy images of their day-to-lives is pretty much impossible.
But, fear not! There are things you can do to help turn those ho-hum snapshots of your kids, into print worthy portraits. And I’m here today to share five ways to help you do just that.
First things first, I want to address the elephant in the room. There’s a nasty rumor floating around that in order to get great looking images you need a great [read: expensive] camera. This is simply NOT TRUE! Shall I repeat that? Okay, one more time. You DO NOT need a big fancy camera to get fabulous looking images! The thing is, while a big DLSR can help you obtain the look you are after by utilizing the different settings and lenses, it’s only going to get you as far as you know how to use it. Stick me in Wolfgang Pucks’ kitchen and I’ll still turn out a mac-n-cheese dish that tastes like cardboard. Regardless of how many fancy kitchen gadgets and high end appliances are at my disposable, I still can’t cook like Wolfgang. The same can be said for photography.
A camera is only as good as the person who’s using it.
So, grab your point-and-shoot, your DSLR, or you camera phone (which, if we are being honest is what I use 99.999% of the time. My iPhone holds pretty much all the photos of my kids from the last year. True story.)…. and get ready to learn some ways to make those shots of your kids shine!
1. Get Low
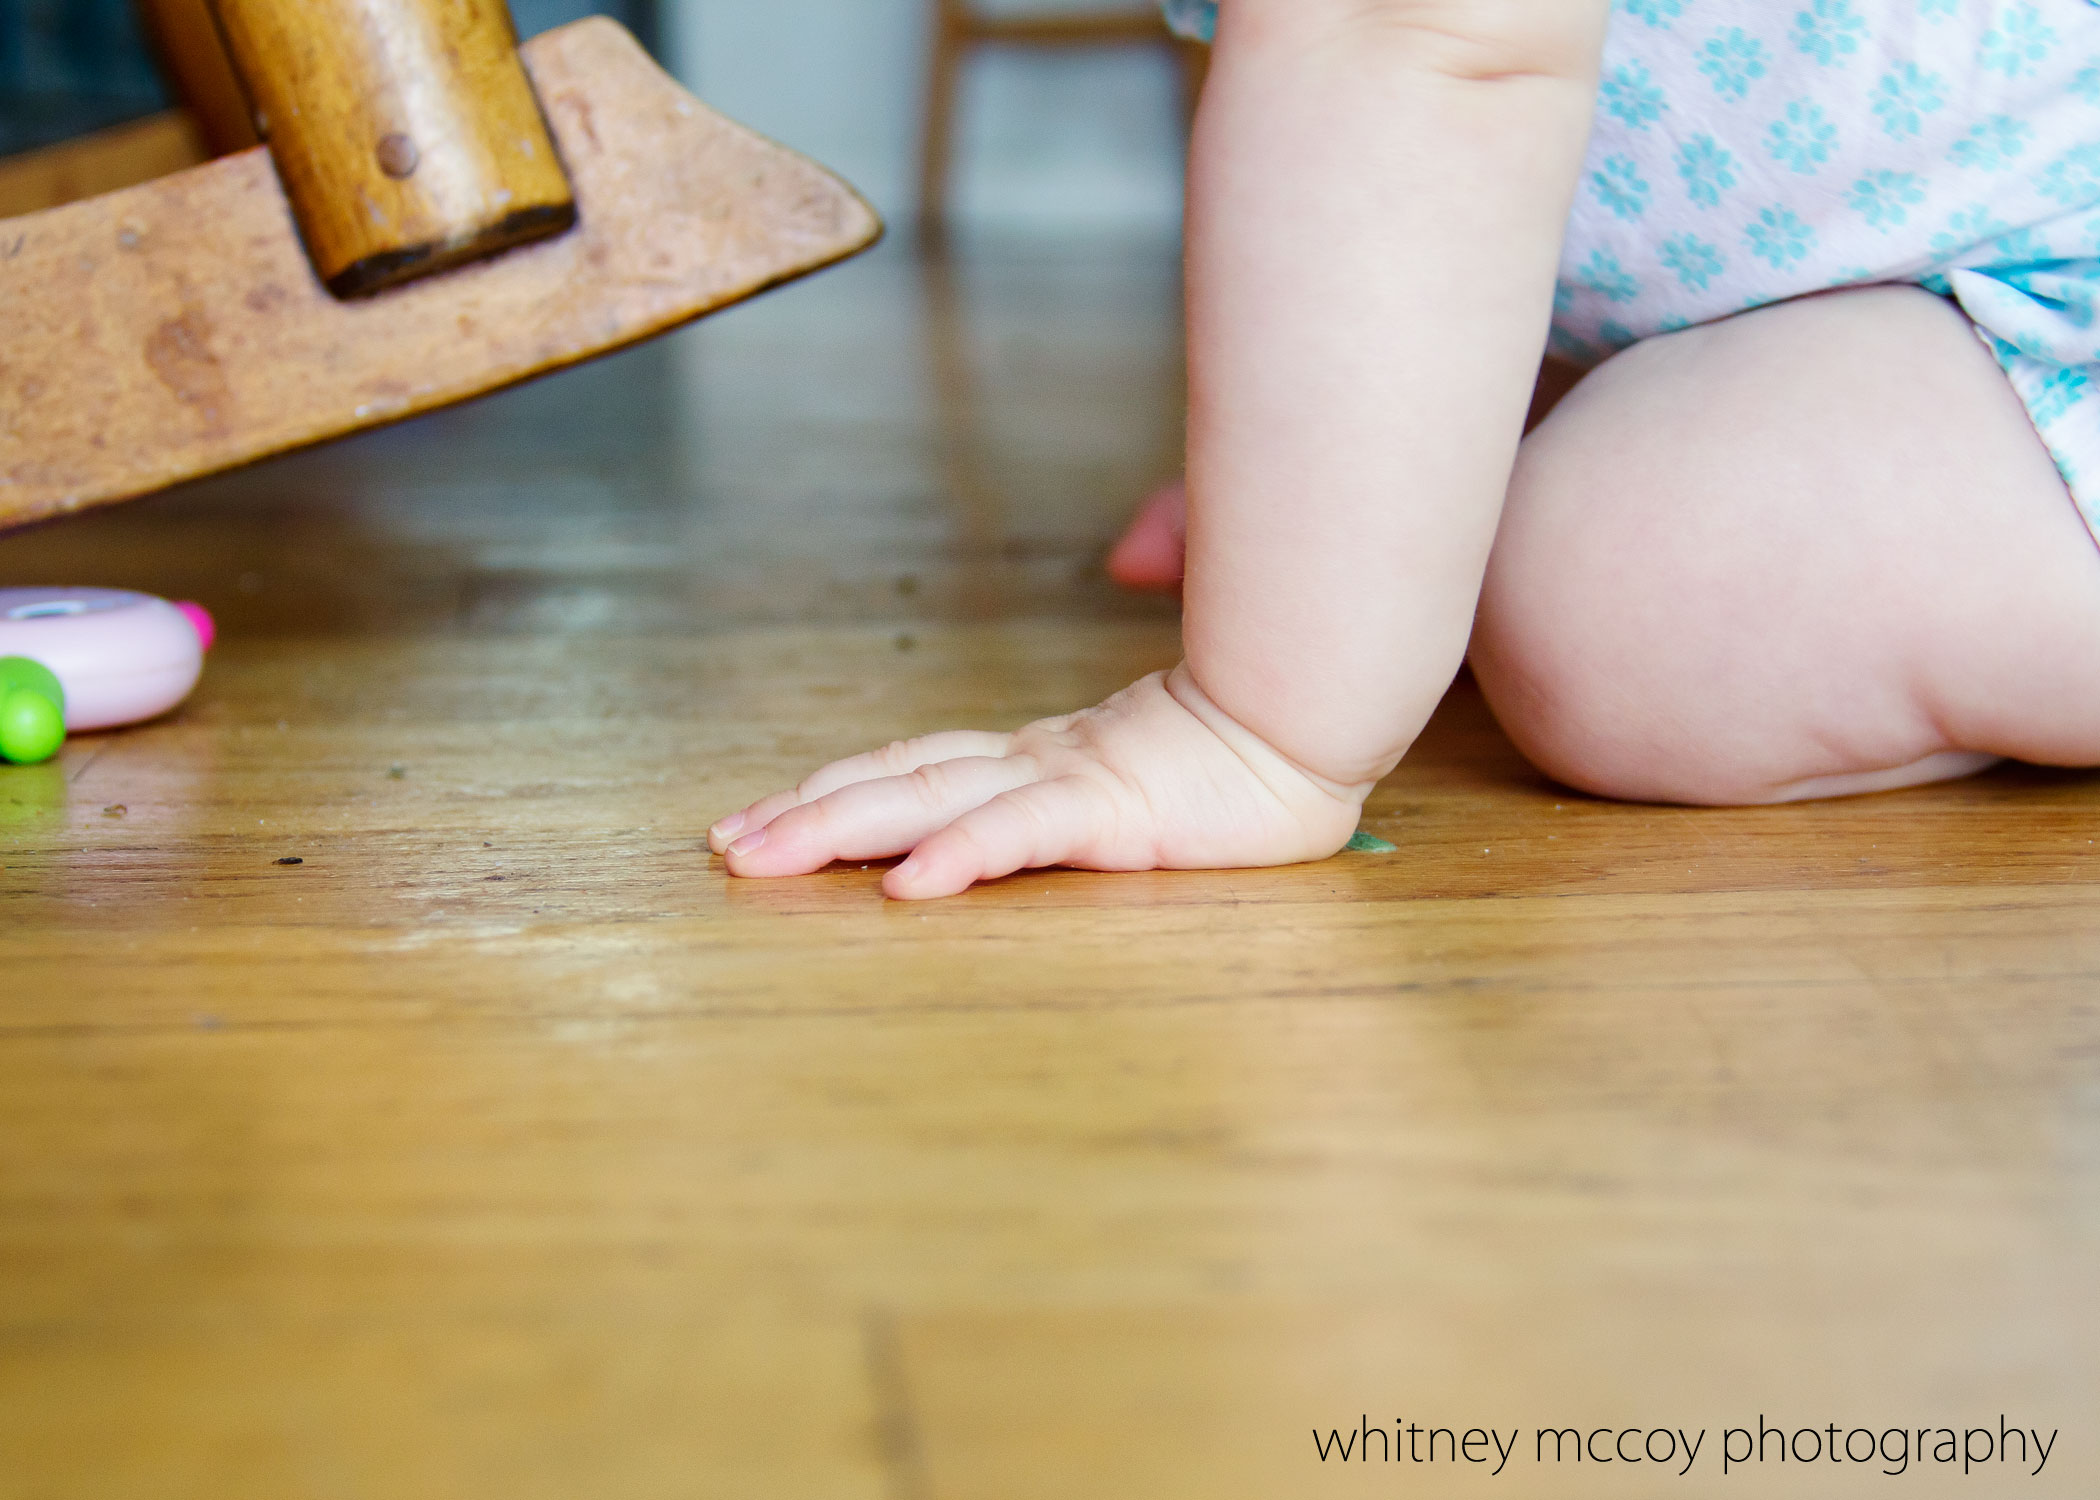
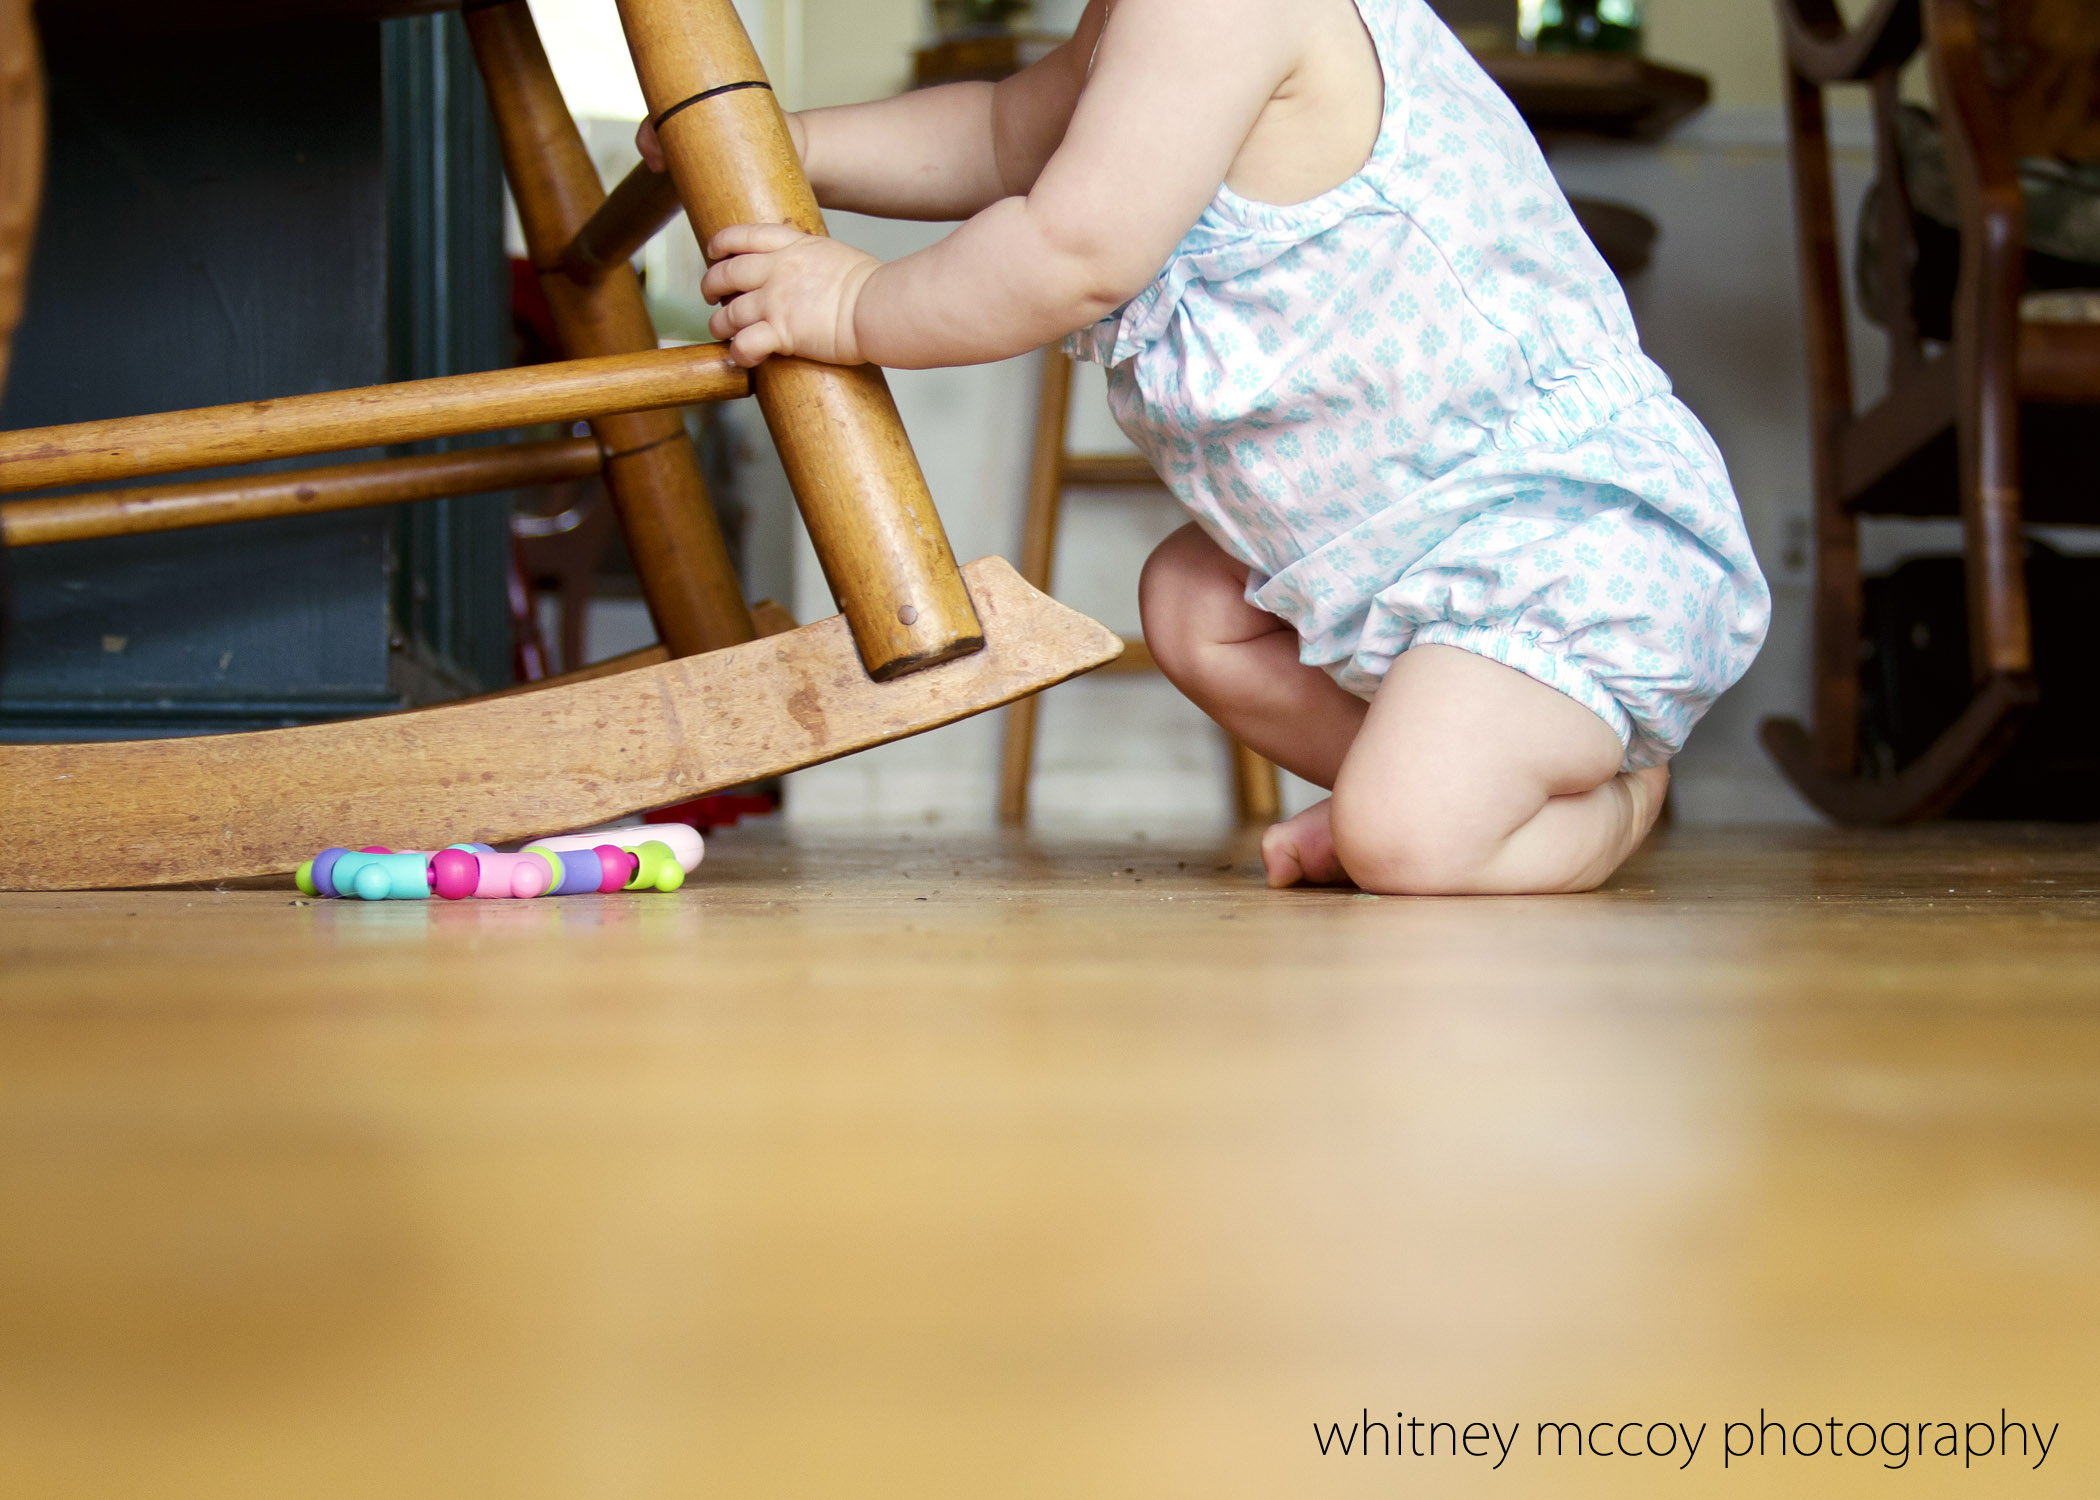
When it comes to getting more creative compositions, changing something as simple as your perspective can dramatically change the overall mood of an image. As adults we often stand, or maybe just squat, to get a shot of our kids. This often results in them looking up at us, and leaving nothing interesting in the background or foreground. By getting on the ground (like, seriously on your stomach, on the ground) we gain a whole new perspective. This often lends to a much more creative and striking image.
Take the photos below as an example. My 9 month old recently learned to crawl. Of course, I needed to document this milestone. By getting down on her level, I was able to get better eye contact, and capture the little details of her cute little leg rolls and dimply hands. Side note: a great image doesn’t have to include faces. Pay attention to details! Kids are only little for so long. You’ll be grateful you captured their tiny fists, and chubby hands when you could, when they are suddenly more interested in playing with friends and going to the mall.

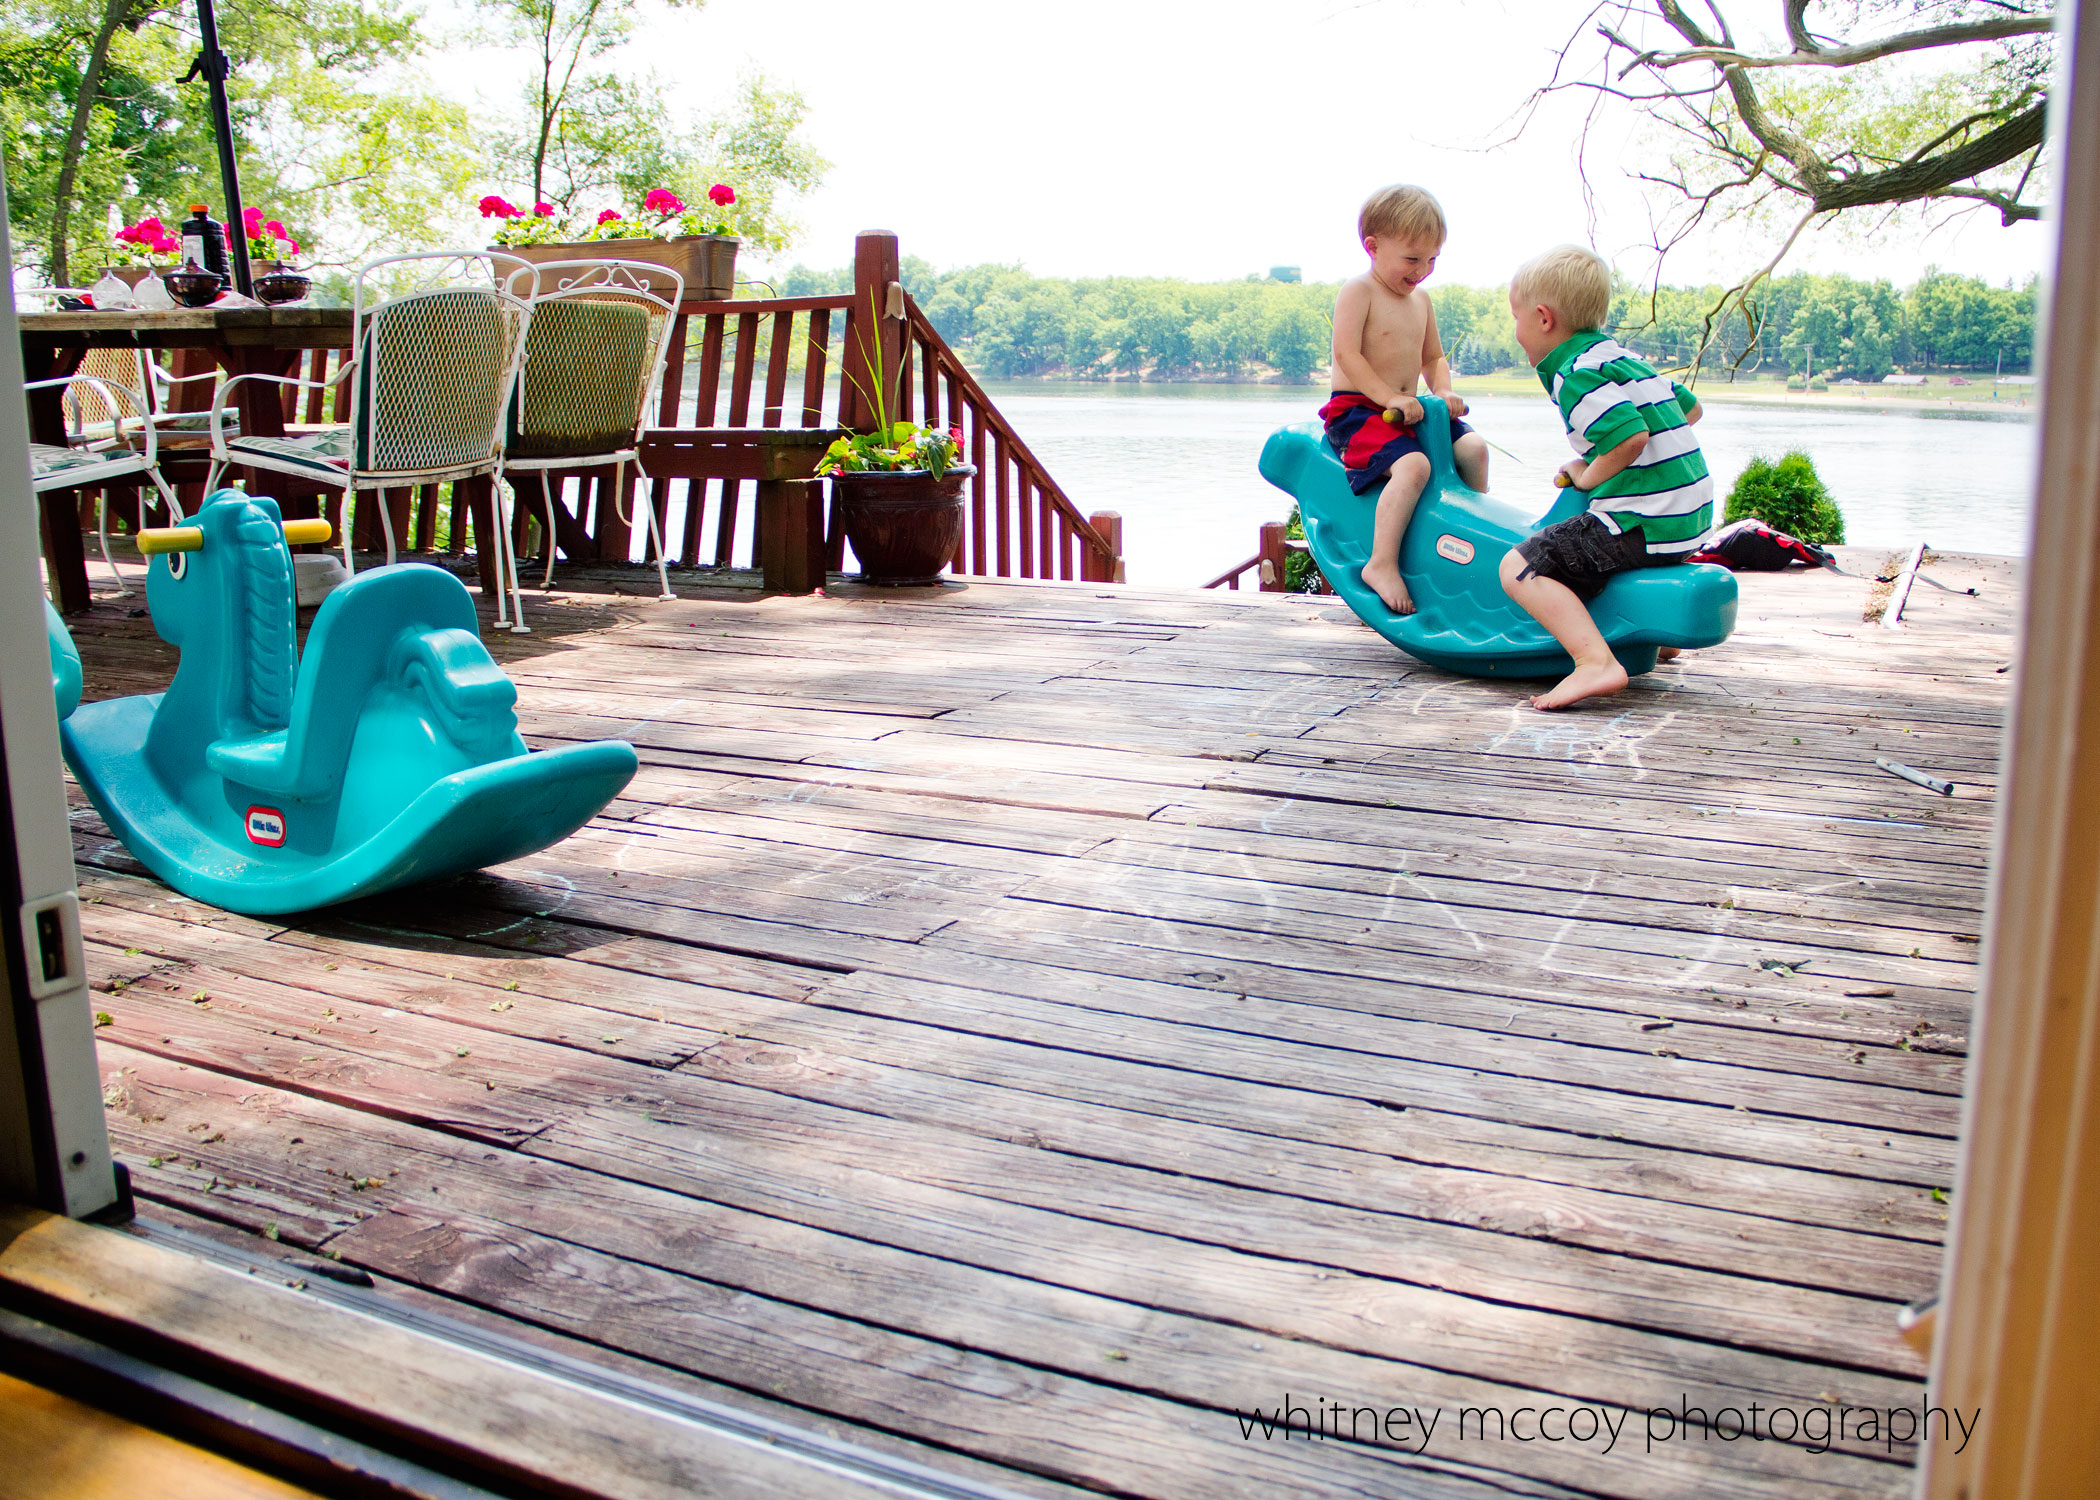
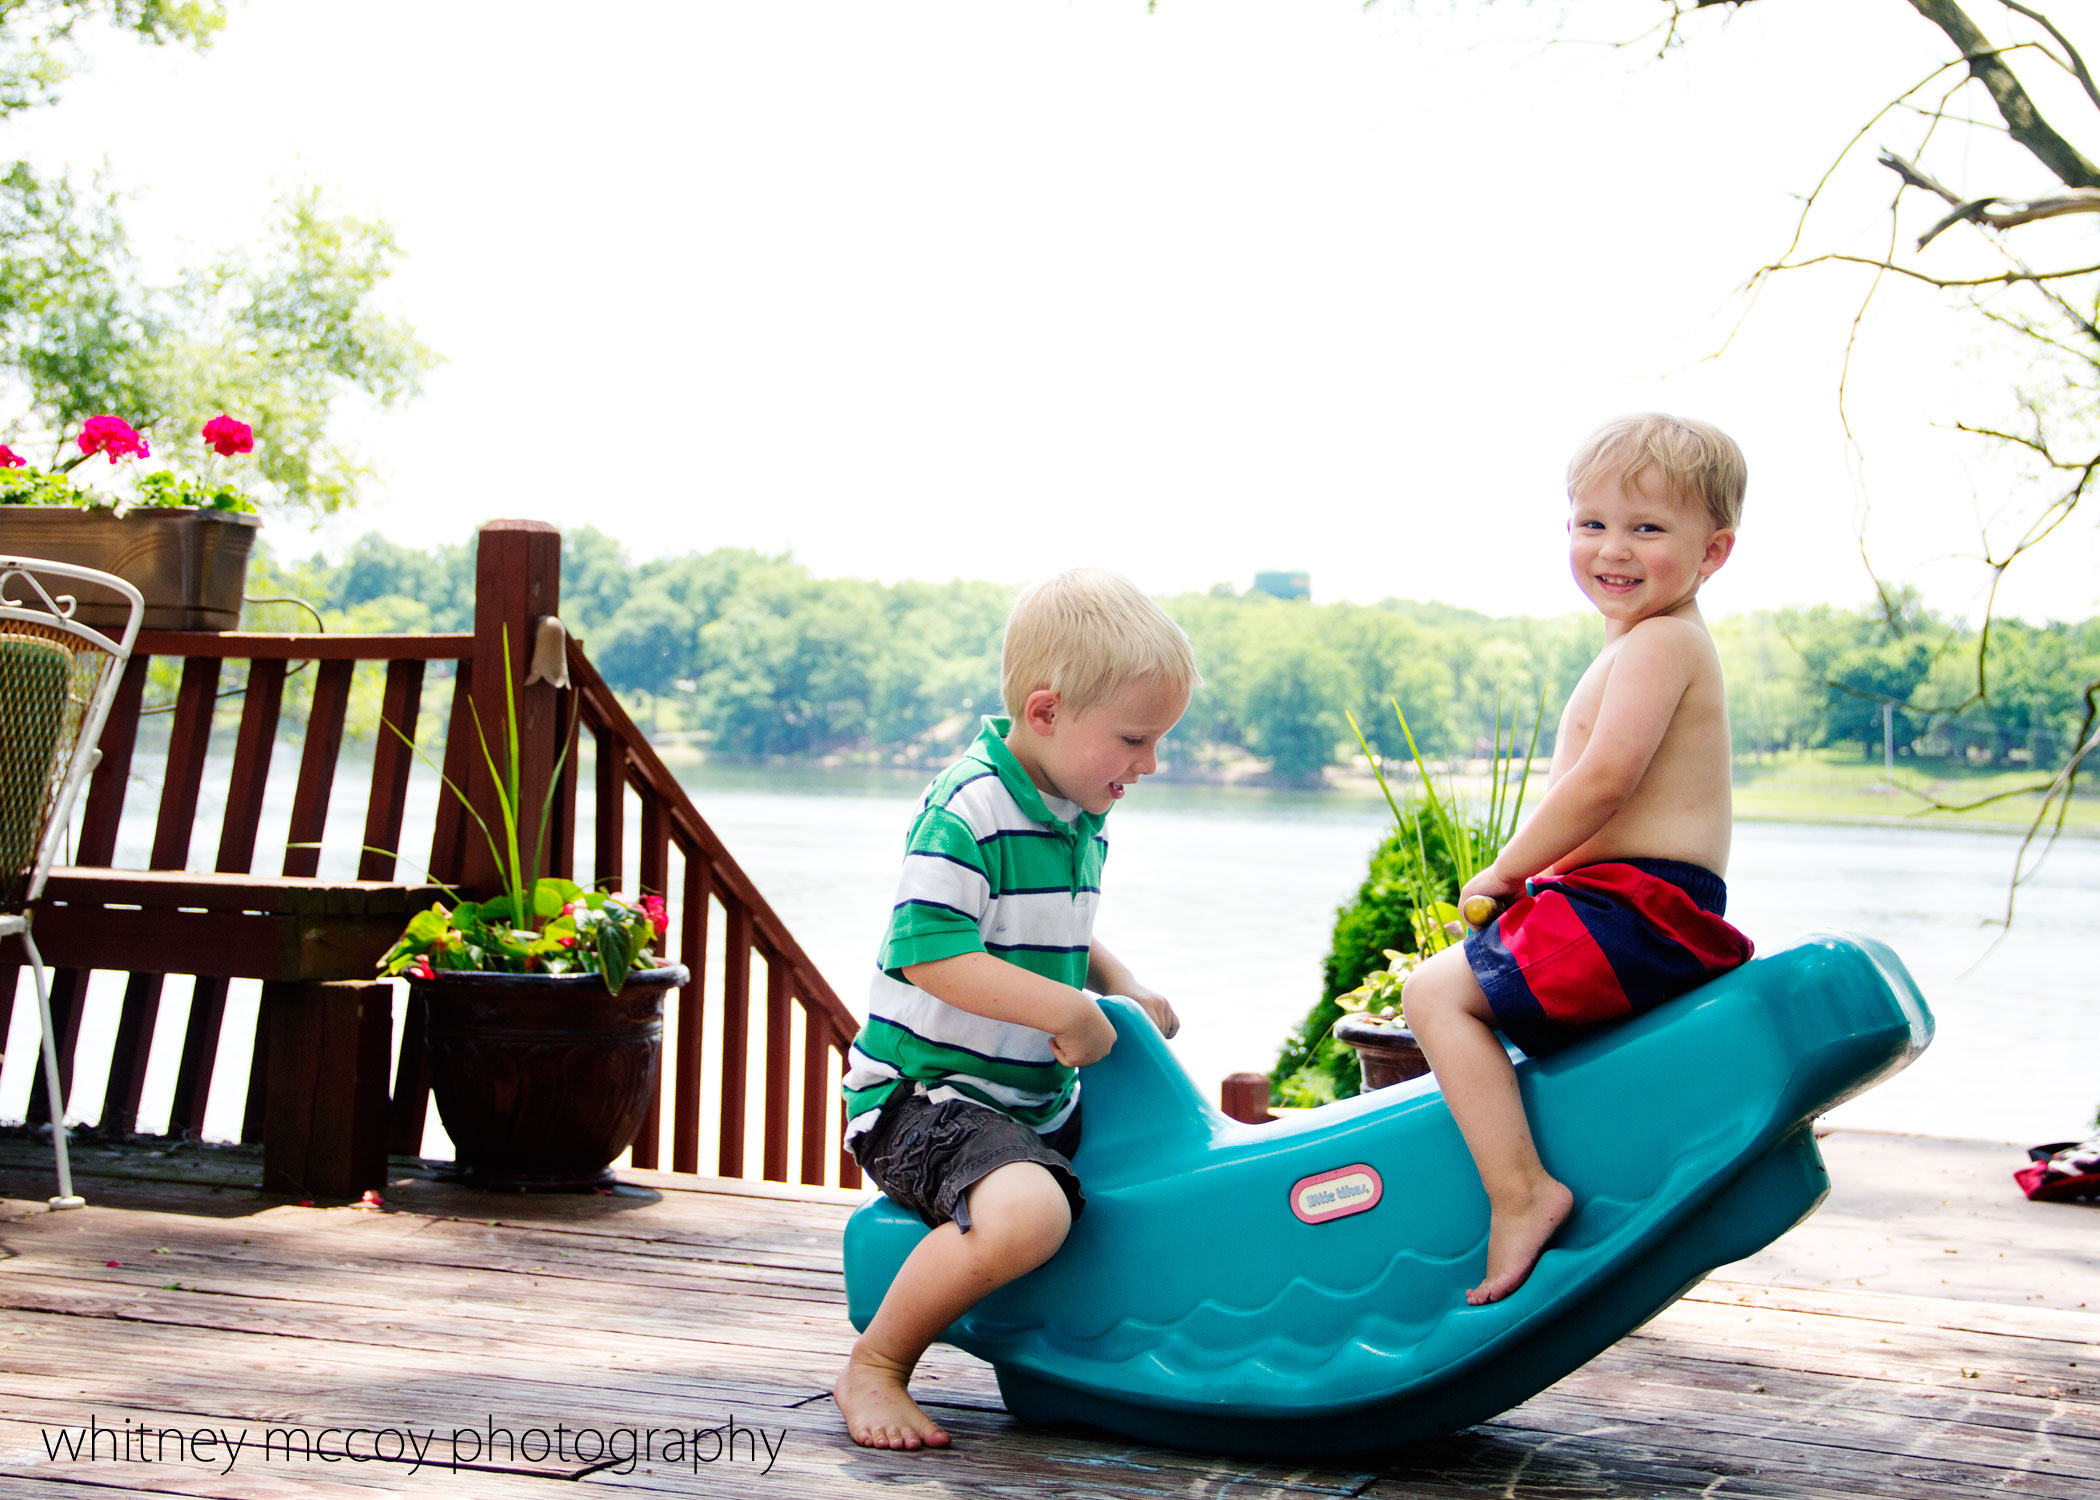
2. Be a Silent Observer
How many times has this happened to you: See kids doing something totally adorable. Grab camera to document said adorableness. Yell to kids, “Look here and say ‘cheese’!” Kids turn and instantly stop doing aforementioned adorable thing, scream,”NOOO!” subsequently running away from you.
Sound familiar? Kids are like wild animals; so cute and very easily spooked. Often, as soon as they realize you want to take their picture they become unwilling and un-cute. But… if you can remain undetected, you can usually get some really cute images of them.
The other day my nephew came over for a play date. He and my son decided to play on the deck. They are 3 and 5 and their moods change faster than Taylor Swift changes boyfriends. Seeing them actually playing nice, I grabbed my camera to document the occasion. (Note I flowed tip #1, get low.) I crouched inside the house, while they played on the deck. They did notice me after a few minutes. But not before I was able to capture some truly joyful expressions. No amount of “say cheese” could have gotten these images.
Try it next time with your kids. It can be something as simple as them playing nicely in their rooms, or walking along together while visiting the zoo. The point is, keep the camera handy and be careful not to draw to much attention to yourself when you are snapping away.
3. Tell a Story
One goal of photography to tell a story to your viewers without using a single word. Let the images do the talking. I’m not talking about 50 selfies of your trip to the Statue of Liberty last summer. I’m talking about capturing details and moments to tell the story of your trip/birthday party/graduation/day at the lake with your kids.
Think of how a book is laid out: you have a beginning, a middle, and an end. Your images should follow the same pattern. You also want to incorporate the first two tips into this one: getting low and being a silent observer.
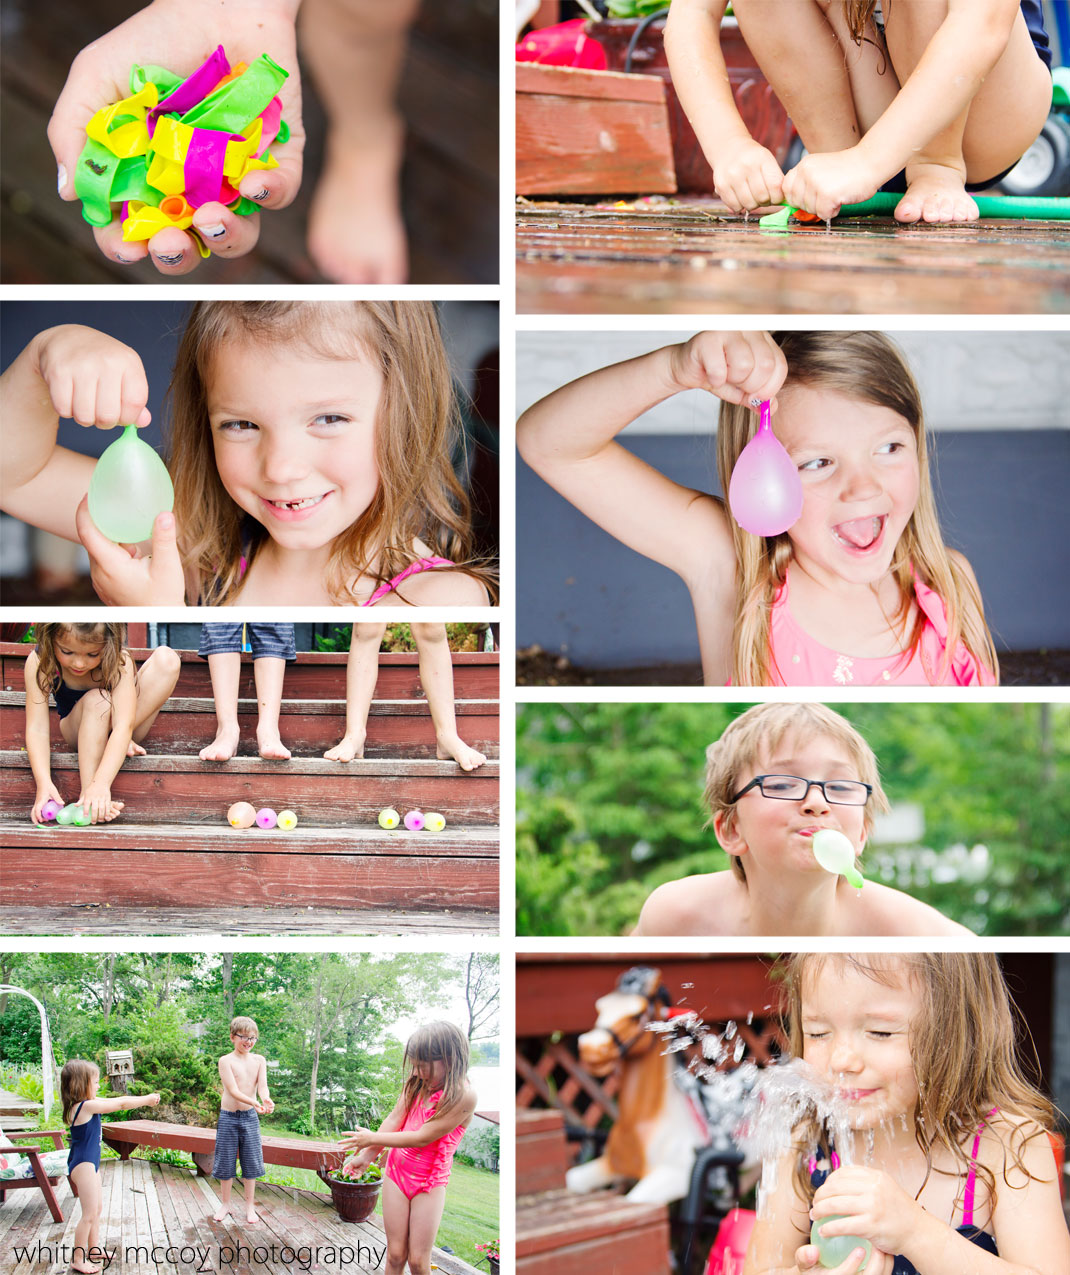
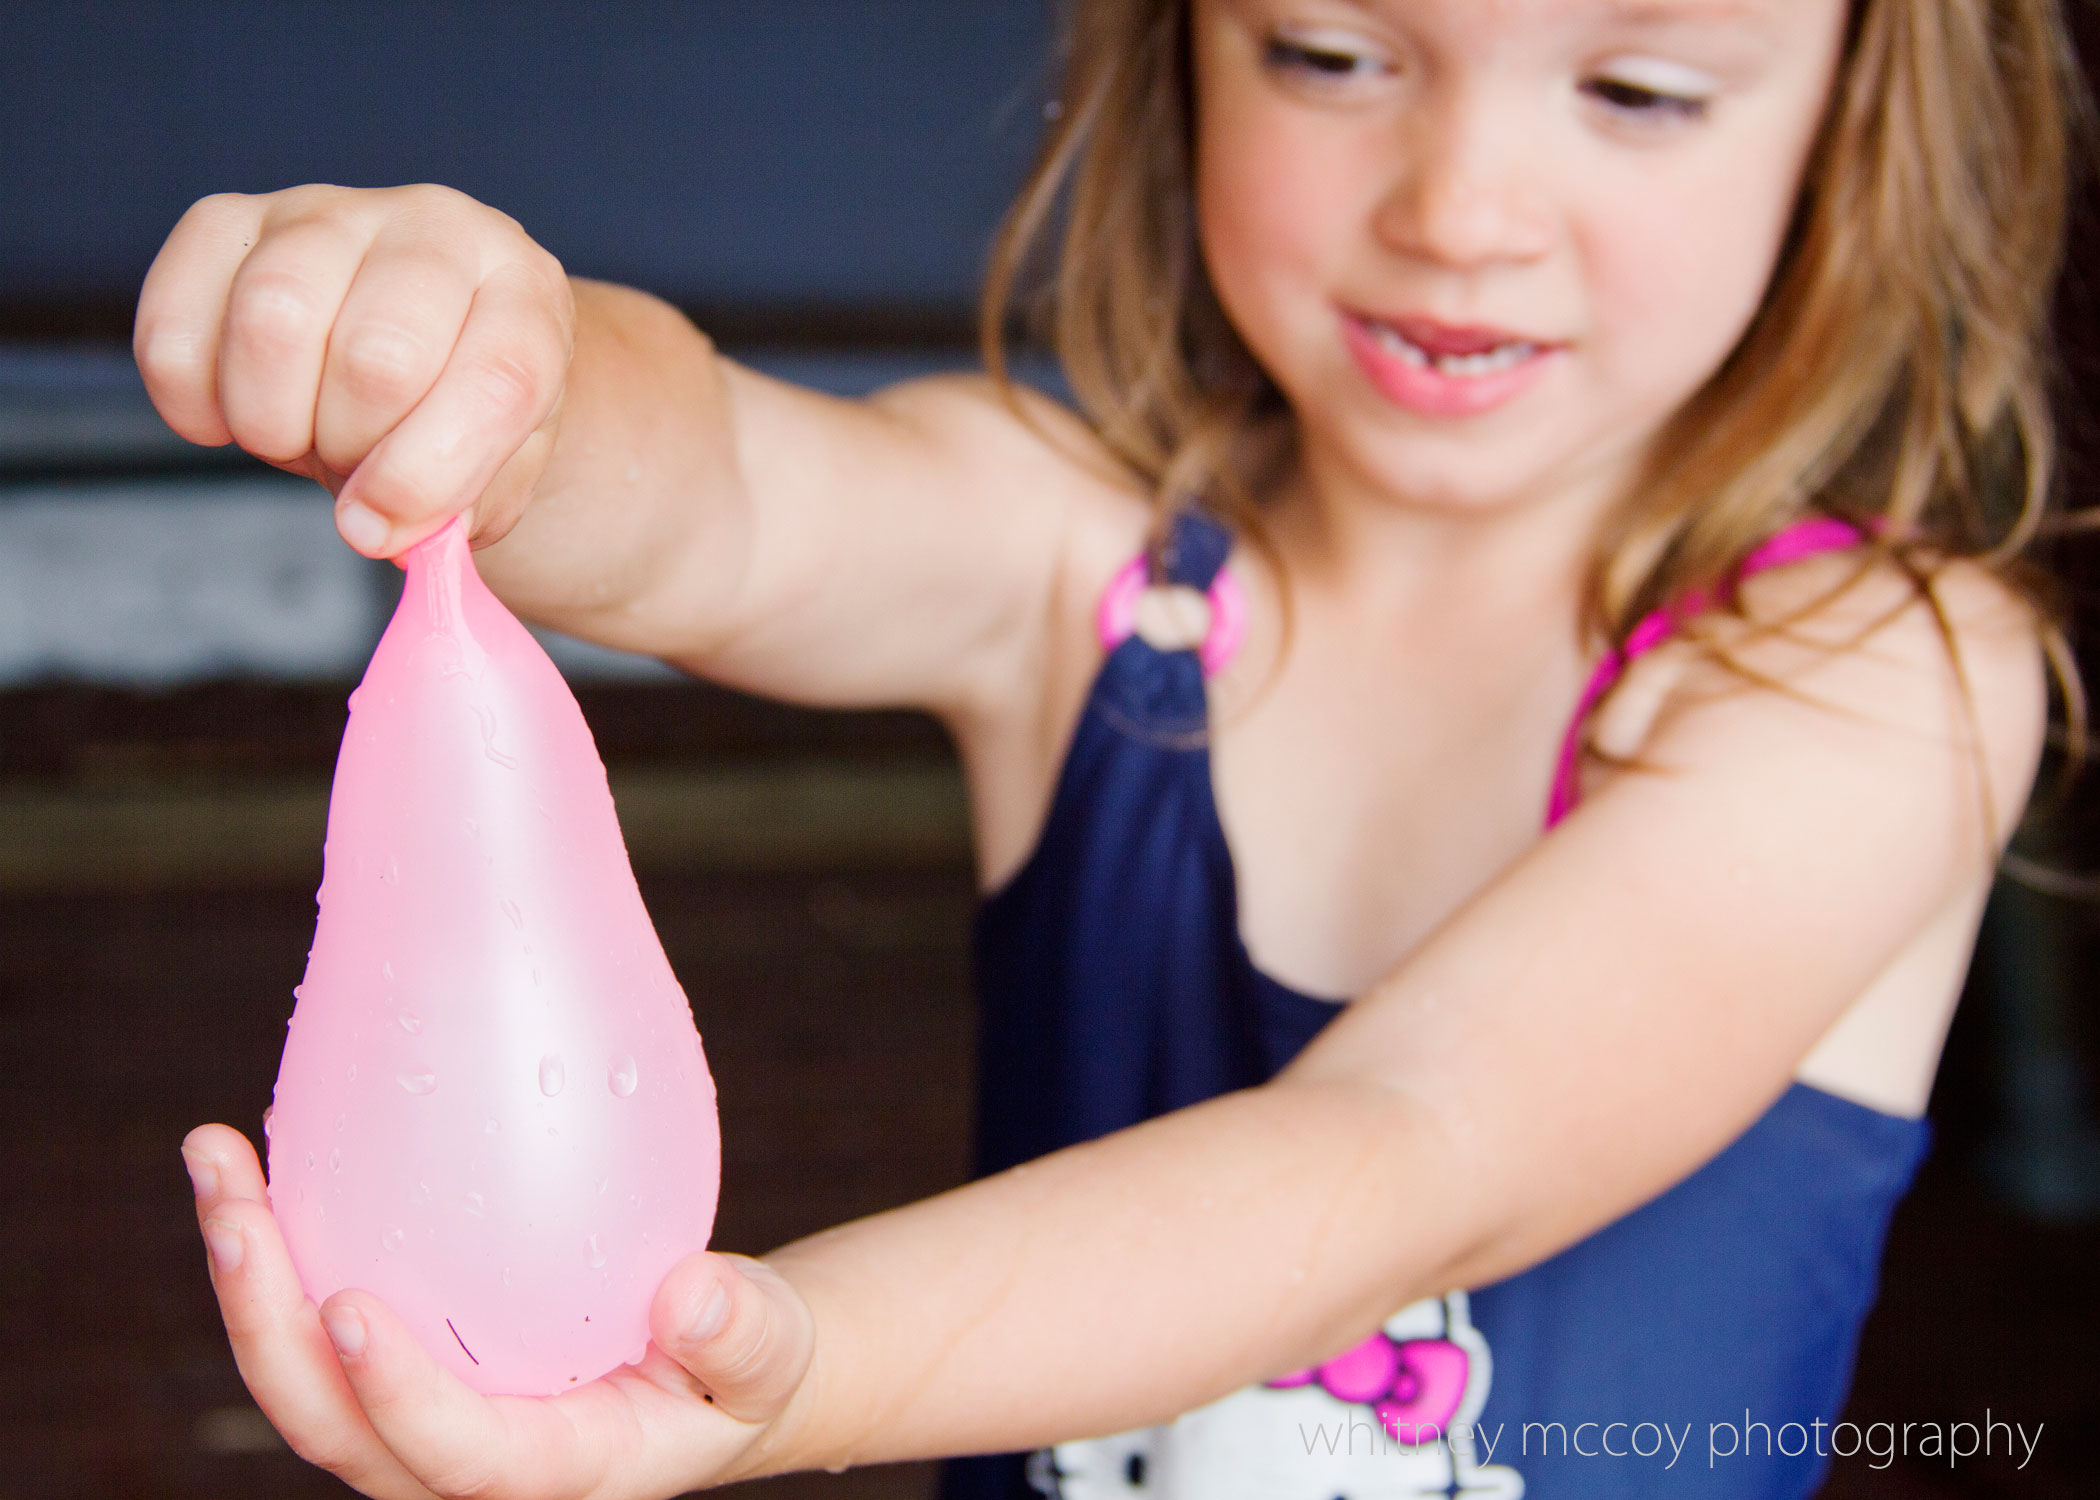
On the last day of school I decided to be a “fun mom” and let my kids go crazy with water balloons. Little did they know it was my secret attempt to capture some images of them just being themselves. And, if I was lucky, actually getting along.
I gave them the balloons and let them go crazy. I made sure to capture them filling up the balloons, their dirty feet and the water, the filled balloons, popping them in their faces, and throwing them at each other.
They were so busy with the balloons that they hardly noticed me. I was even able to get some shots of my very difficult-to-photograph 5 year old. She typically NEVER lets me take her picture. However, by giving her something to occupy her, I was able to sneak a few shots in.
As a result of my 20 minutes of watching them play with the balloons, I now have a nice collection of images for my hallway.

4. Go to the Garage
There’s a little secret in the photographic community that the best natural light can be found in ones’ own garage. Yes, I said garage. If you want bright, even and well lit images, the garage is where you are going to get them.
Simply place your subject a few feet just inside the garage and start snapping. Have them look upward, to get as much light in their eyes as possible. (Those sparkly things in her eyes are known as “catchlights” and they are good. You want those.)
No worries if your garage is cluttered and not “photo worthy”, simply zoom in close to your subject and fill the frame with their face. The idea here is to get a nice, close-up portrait of your child.

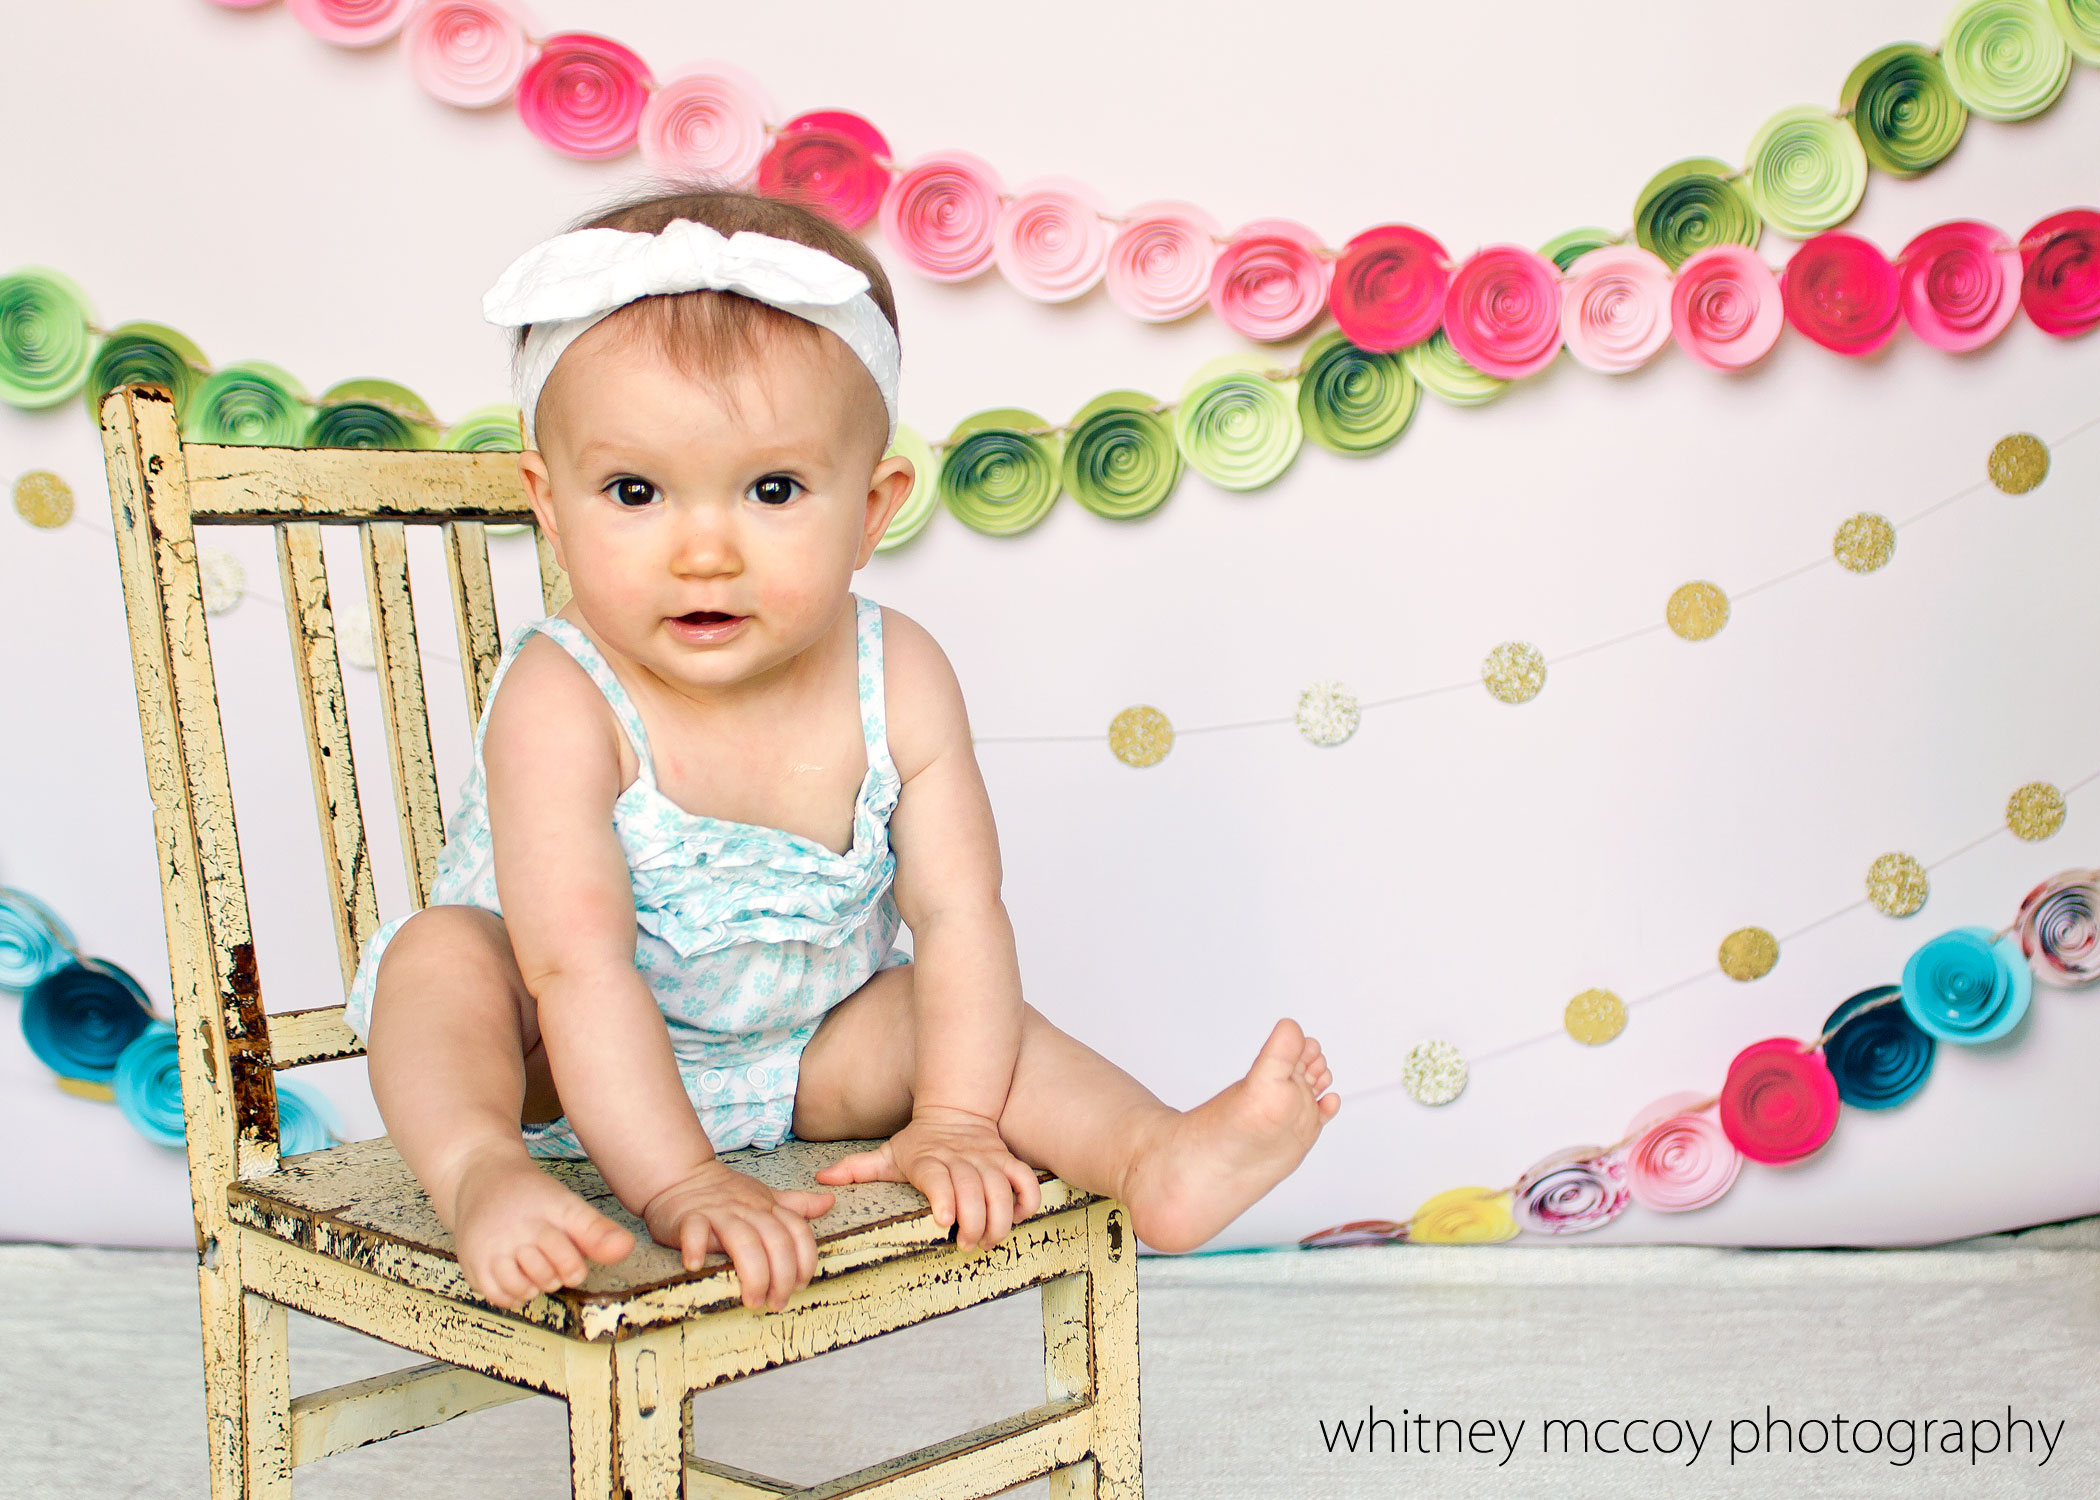
5. Create an In-Home “Studio”
This last tip is one that takes a bit of “construction”, but never fear, it’s easy.
A great way to get professional looking images of your child is to start with a professional set up. This can actually be easily achieved. With the rise in professional photographers, there has also been a rise in shops that specialize in backdrops and floor mats for studio set-ups. One such shop is PepperLu. They offer a wide selection of backdrops and floor mats. They are high quality, but not high price. Their photographic backgrounds (which you can see below) are amazing! Who has time to set up those cute buntings and tassels every time they take pictures?! Not me. PepperLu’s backdrops look so real in your images, you’ll never want to bother with real buntings, paper fans, or tassels again. And there is no need to worry about glare, or reflections on these puppies. Their matte finish ensures no unwanted reflection or glare in your images. They are also tear resistant, a major plus when dealing with kids.
Now, you are going to need a backdrop stand to go along with your cute backdrop. There are a few ways to go about this. First, if you are a handy type of person, you can try making one. There are literally hundreds of tutorials online on making your own stand. The majority are constructed from PVC pipe. Here is a great example of a homemade backdrop stand.
If you don’t want the hassle of making your own, you can buy a stand. Photography backdrop stands usually run around $100. That’s a good chunk of change to shell out when you are only planning to shoot your own kids. But guess what! You know those handy little rolling garment racks? Those make perfect backdrop stands, plus they fold up for easy storage. You can find them ranging in price from around $20 to $80. Just pick whichever one suits your needs (check the max height and width to make sure it will accommodate your backdrops and children). This one is a great deal.
Once you have your stand and your backdrop, you want to choose a room in your home (or your garage) with lots of light. North facing windows are best, but south work well too. If you don’t have either of those options, using east or west facing windows will work, just make sure you are shooting at a time when the sun isn’t shining directly into the widows. The goal is nice, evenly lit images. For the photos below, I had my set-up in front of a wall of French doors facing SW. It was around 10am, so the light coming in was nice and diffused.
All you need to secure your backdrop to your stand are two clamps. These can be purchased at any hardware store. Or, if you are lucky, your hubby may already have some in your garage. Simply drape the backdrop over your stand and secure it with the clamps. PepperLu drops arrive all nice and rolled up in great cardboard tubes (save the tube for storage later), and slide out easily. They don’t wrinkle or tear, so if you are “less than gentle” with them, it’s not a problem. Just make sure they are even (this is especially important if you have any type of lines printed on your drop. Any crooked lines will make the final image appear titled. Not cute.)

Once you have your set-up complete it’s time to take some photos. Anytime I photograph young children on a backdrop I try to have a prop to hold their attention, or to literally “hold” them. In this case, I used a chair. It adds interest to the photo, while simultaneously keeping the child contained. Sort of.
Make sure you have your subject at least two or three feet away from your backdrop. This will help eliminate shadows on the drop. Start with a few up close and then a few full body shots. Try and keep it light, no pressure. Kids clam up when they have things demanded of them. Telling a kids to “say cheese!” is a sure fire way to get them NOT to smile, or it produces cheesy, toothy smiles. You have to be a goofball, get them to laugh at you. I had just accused my baby of “tooting” to get my nephew to crack up in the images below.
If all else fails, have them recite their vowels. Seriously. Go into your bathroom, looking in the mirror and recite A, E, I, O, U. With the exception of the last two, the first three will produce nice, parted mouth, smiles. The kids also think it’s silly. 😉 But it will get those non-cheesy smiles you are after.


So there you have it, five tips to help you capture better images of your kids. Don’t worry if it takes some practice, and patience. If you start implementing these now, you should be churning out some pretty rockin’ photos by summers end.
PepperLu Coupon Code
Want to snag a backdrop or two to get some cute photos of your kids? PepperLu is offering Busy Mommy Media readers 25% off through August 31, 2014.

PepperLu Backdrop Giveaway (Giveaway Over)
One lucky Busy Mommy Media reader will win their choice of 5’x6′ backdrop on textile from PepperLu! They have some adorable designs so I’m sure you’ll find something you’ll love!
This giveaway is open to the U.S. Please see our site’s Terms and Conditions for a complete list of our contest and giveaway rules.
![]()
Want to be notified when we post a new giveaway? Be sure and subscribe so you don’t miss out on anything.
You may also like:


Thanks for the tips and fun giveaway!
I love Pepperlu! And bonk yourself on the head with your free hand…kids love it!
My biggest comment would be the older they are, the less cooperation I seem to get, especially with my boys. I almost never tell them I’m taking a picture now – they make silly faces or hide them completely. So take as many pictures as you can while they are little!
Thanks for these! This is a great reminder to get back behind the lens!
The main thing I struggle with is natural light in the house or even in our yard.. considering we have hardly any trees on our property, we have horrid natural lighting because we are surrounded by trees (just wish if they were going to cause lighting issues they’d at least be ON our property haha)/
Christina, ugh.. I feel ya girl! If you can find a shady spot, like next to your house, or get outside on an overcast day. Overcast days (not super dark and cloudy days) are great for giving off diffused lighting. 🙂
Hi Christina, man.. I feel ya on the “bad lighting”. It can be such a pain if you don’t have any nice, evenly shaded areas to work in. My suggestion; try to get in some shade next to your house. (remember to watch the background for unattractive things, like cars, and other houses). If that’s not an option, get outside on overcast days! Overcast days off nice, diffused light. You won’t have to worry about any nasty shadows, or bright spots. 🙂
Thanks for the great tips and awesome giveaway!!
I always have a hard time with getting the lighting correct.
Marci, Lighting is a tough one. If you are outside, try getting into some open shade, like under a tree, or next to a building that’s casting a large shadow on the ground. Or, get out on overcast days. You’ll get some nice, diffused light. 🙂
Getting them to stay still for a minute when I want them to do something specific.
Mary, Oh man… that is SO tough. I really struggled with that at the beginning of my career. I finally discovered that there really was NO way to truly get a little one to do “exactly” what I wanted, when I wanted it. I’ve learned to let the kids lead me. Literally. I spend a lot of time just following them around, and letting them do their thing.
If there IS something I want them to do, or someplace I want them to be, I try to have something to get their attention. Like, if I want a shot of them playing with some leaves, I will say something like..”Oh man.. look at those cool leaves! Wanna throw some at your mom?” That usually works. 😉
A tip I have is to not just be an observer, but take advantage of the fact that you have a digital camera as opposed to film where every click cost you money. Just snap, snap, snap as you follow your child around.
I’m pretty good at taking pictures, my main problem is I haven’t taken the time to really get to know my camera. It such a great camera and has so many different modes and setting and I always have it on automatic everything!
Shannon, Read the manual!! 😉 Seriously… Just take about 30 mins or so, sit down with a nice coffee or whatever, and read every little bit of that manual. It will really help you learn your camera. After that, read “Understanding Exposure” but Bryan Petersen. GREAT book!
I just wanted to let you know that I took your advice and I read my manual! Idk what took me so long but now my photography game has improved so much! My husband even complimented me on it! 🙂 I may check out that book now too!! Thanks for helping me!
I struggle to get the children to look in the same place at the same time, its daunting!
D, ahh…. every photographer struggles with this. This is where Photoshop will become your BFF!! I take multiple shots of the same scene, and then head swap in PS. It’s sometimes the ONLY way to get everyone looking. Especially in large family portraits.
I really need to remember the “be a silent observer” tip! Thanks!
My biggest confusion is not knowing when to use a white card for CWB and when to use gray. I know more practice is what I need,but I still just walk away each time scratchin my head..
I shamelessly bribe my kids to get them to cooperate for photos!
Capturing candid moments with my camera
I have problems with shooting too many blurry photos and poor lighting
I struggle with getting natural looking expressions when they know I am taking their picture.
Love these backdrops. Sooo cute. I struggle with having them look at the camera or having good lighting that isn’t casting a shadow.
When my kids were little, we would give them a prop to play with and they would smile.
My best photography shots happen usually happen when my children are preoccupied with something. Otherwise, energetic as they are, it’s hard to take pictures of them!
Getting them to look at the camera sometimes can be challenging but sometimes, those natural shots are my favorite! Lighting is also an issue at times but I hope to tackle that. Oh and editing, I am not educated on PS or LR yet so its hard for me. Thanks for the chance!:)
one of my biggest struggles is getting my kids to smile “normally” instead of cheesy
I am looking forward to using your tips. Your pictures are beautiful!
Great tips! I struggle with getting a photo that looks natural…I have a tween and a toddler. My tween gets bored and my toddler always wants to run away!
My photos of my grandkids usually turn out too dark, too light, or blurry. Thanks for the tips!
They like to move around a lot.
I try to wait until they forget I have a camera.
Many thanks for the great tips and awesome giveaway!!
I have trouble with my kids all looking at the same time.
Proper lighting is often a problem.
When my kids know I’m taking a photo of them, they can’t keep a straight face. They act silly and make goofy faces =(
My daughter blinks constantly when I try to take photos of her!
I love these photos and drops what an awesome giveaway
Thanks so much for the tips! Just bought 5 backdrops with that code, so excited!!!